Tool Data for TEAMCENTER

Access thousands of cutting tool specifications form leading manufacturers and seamlessly import them into TEAMCENTER. Save time, reduce errors, and optimize your tool management workflow.

What Is TEAMCENTER?

Teamcenter is a product lifecycle management (PLM) solution designed to help manufacturers manage product data, engineering processes, and collaboration across the entire product development lifecycle. The platform enables organizations to centralize technical information, streamline workflows, and improve coordination between engineering, manufacturing, and production teams within a unified digital environment.

Developed by Siemens Digital Industries Software, Teamcenter integrates with CAD, CAM, ERP, and manufacturing systems to support digital continuity throughout product design and production. The solution helps manufacturers improve data consistency, accelerate development processes, and optimize complex manufacturing operations through connected and scalable PLM technologies.

Why Use ToolsUnited with TEAMCENTER?

ToolsUnited brings together tool data from different manufacturers in a single, reliable source — ready to use for your application.

1,334,650 unique tool components

Access a continuously growing library of tool components from leading manufacturers — all in one place, ready to be pulled directly into your workflow

62 world class brands and manufacturers

Source tools from more and more internationally recognized tool manufacturers. Whether you work with Sandvik, Kennametal, Walter, or others — ToolsUnited brings their complete catalogs together in a single, unified interface.

Checked data quality & DIN/ISO compatibility

Every tool component in ToolsUnited is validated for data integrity and complies with DIN/ISO standards. This ensures your CAM or tool management system receives clean, consistent data — no manual corrections, no compatibility issues.

File exports optimized for TEAMCENTER

ToolsUnited generates tool data exports specifically formatted for TEAMCENTER. Import-ready files ensure seamless compatibility and save your team the time spent on reformatting or data cleanup.

Watch the How-To Video

See how to find and import tool data in just a few clicks — from search to ready-to-use tool assembly.

Follow the Step-by-Step Guide

New to the integration? Our guide walks you through setup and your first successful tool data transfer, step by step.

1

Import of the GTC class hierarchy

  • Download GTC Class Hierarchy
  • Conduct a manual “Unzip” on the Teamcenter Server
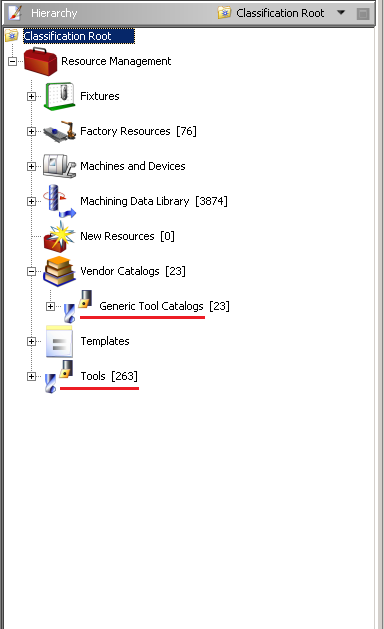
  • Control if the MRL (Manufacturing Resource Library) has been installed. In your navigation pane, move to “Classification”. Opening the “Classification Root”, you should see “Tools” as well as “Generic Tool Catalogs”. If not, you will find the MRL installer in the Teamcenter kit in the “advanced installations” folder.
2

Change settings

  • Follow Edit -> Options -> Search -> Search on Keywords in order to change settings
  • Search for “MRMGTCCloudAccess” and set its Value to “true” in order to display the ToolsUnited search icons. This step is no more necessary on Teamcenter Releases higher than 10.1.3
  • Search for “MRMTUURL” and set its value to http://www.toolsunited.com/App and save your changes.
  • Search for “MRMGTCVendorCatalogRootDir”. This preference indicates in which directories GTC Packages will be stored on the Teamcenter Server. The default settings are C:\VendorCatalogs and D:\VendorCatalogs.
3

Place GTC-Package

  • Please unzip or paste the data of the GTC-Package into either one of these folders (Create the directories on the Teamcenter Server if necessary).
  • Afterwards, you will find the directory “GTC_Package_CIM_20150702-2_hierarchy_only” at this location, including three sub-directories.
4

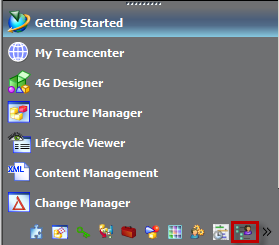
Use navigation panel

In the navigation pane on the lower left side, move to “Classification admin”
5

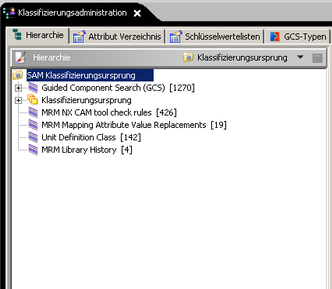
Open the „SAM Classification root“

Open the „SAM Classification root“ by double-clicking it
6

Import vendor catalog class hierarchy

Find and click the button “Import vendor catalog class hierarchy” in the Teamcenter toolbar at the top

7

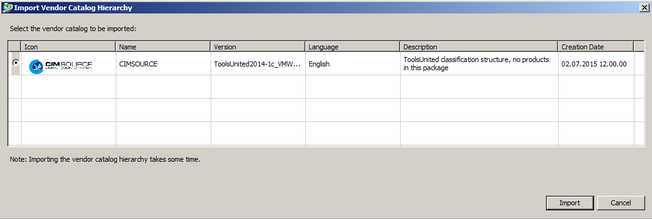
Import vendor catalog

A dialog with additional information about the GTC package will be displayed. Click “Import” and wait until it is completed.
8

Wait for completion

A log dialog will be displayed, stating the successful import. You may decline it.

9

Search for tools

One option to find tools in Teamcenter is the general search, using the web interface of ToolsUnited.
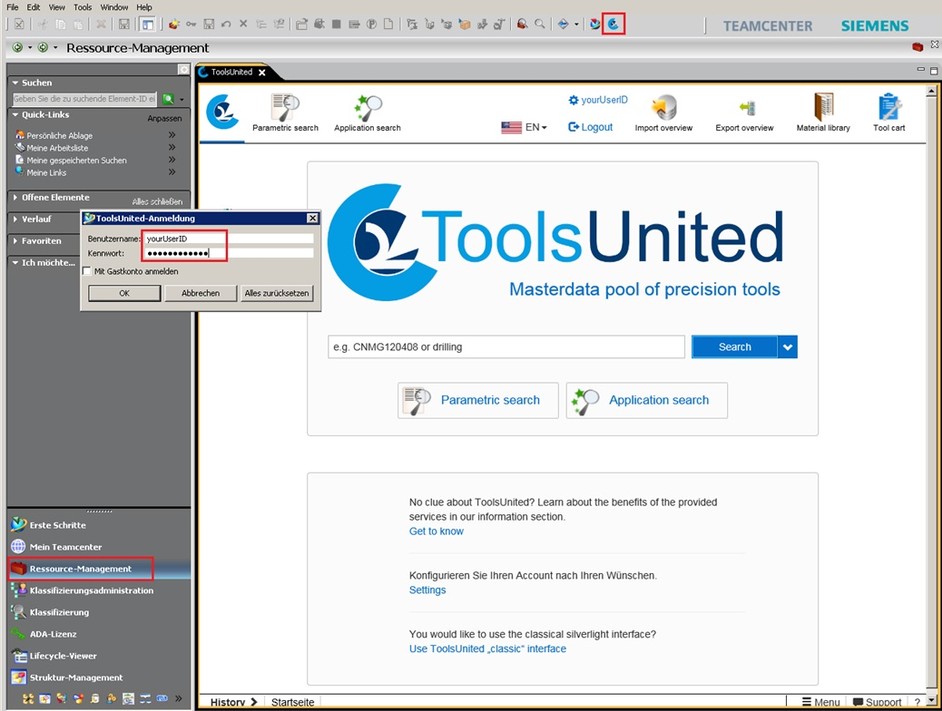
  • Move to the navigation pane on the lower left of your Teamcenter interface and navigate to the “Resource-Management” dialog.
  • Use the CIMSOURCE button in the toolbar at the top to access the web interface of ToolsUnited. A dialog will pop up, requesting your username and password.
  • The “ToolsUnited” tab will open, presenting the familiar web interface of ToolsUnited.
10

Classification search dialog

Alternatively, you may use the “Classification Search Dialog” to find tools in Teamcenter.
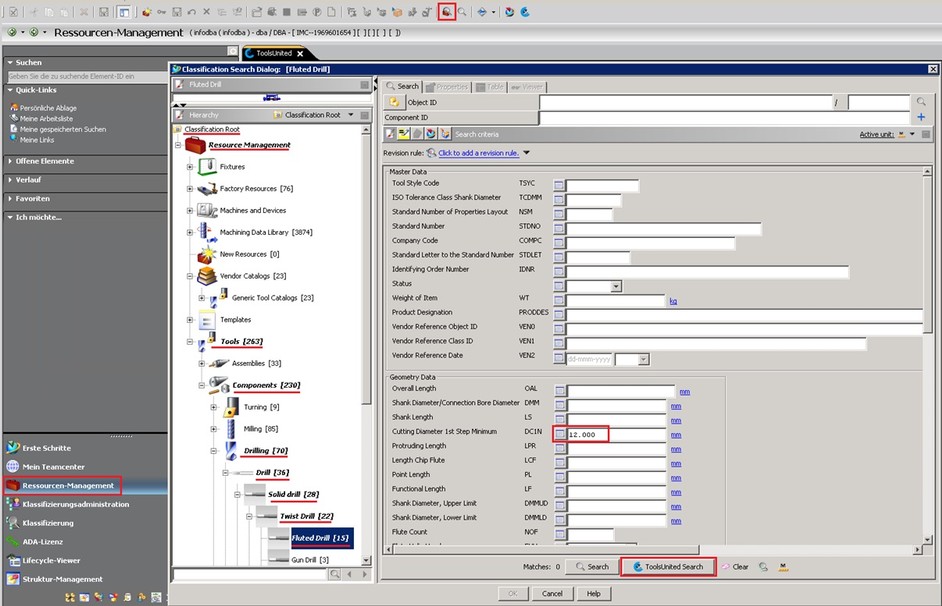
  • Again, move to the navigation pane on the lower left of your Teamcenter interface and navigate to the “Resource-Management” dialog
  • Use the “Classification Search Dialog” button in the toolbar at the top to access the window
  • In that window, use the Classification Root to navigate to the tool class you would like to browse (e.g. Classification Root → Resource Management → Tools → Components → Drilling → Solid drill → Twist Drill → Fluted Drill)
  • Using the “Search criteria” mask, you may define your tool. Start your search by using the “ToolsUnited Search” button
  • The “ToolsUnited” tab will open, presenting your results on the familiar web interface of ToolsUnited
11

Download data from Toolsunited

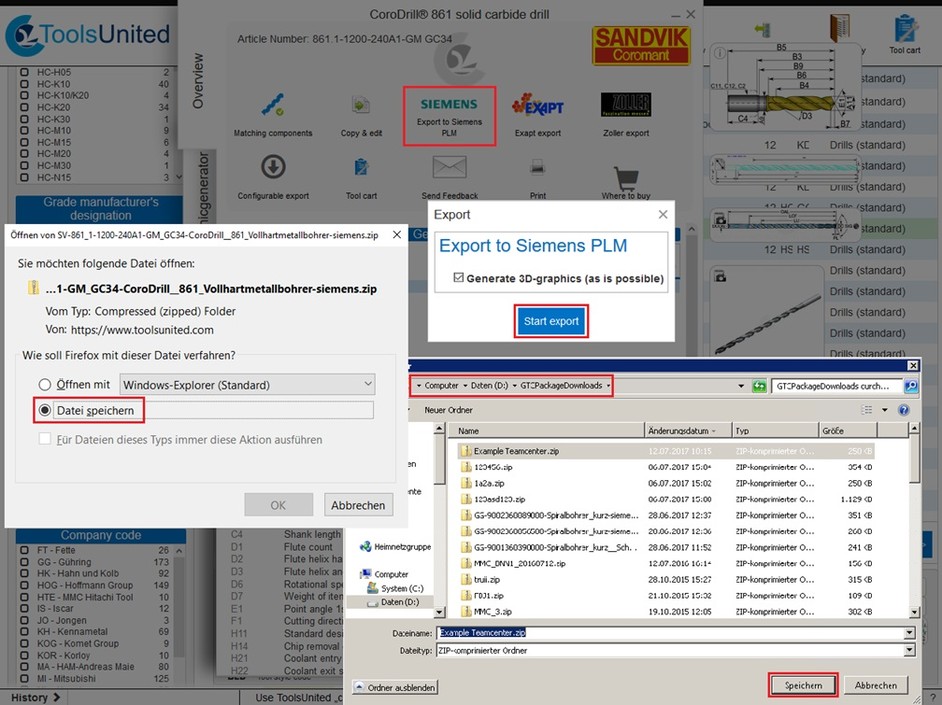
  • When you have selected a tool that matches your search criteria, you may download it by clicking the “Export to Siemens PLM” button.
  • In the export dialog, you may choose whether a 3D graphic shall be generated.
  • After clicking “Start export”, the download options will show. We recommend saving the data in the same directory you’ve chosen earlier in the preference “MRMGTCVendorCatalogRootDir” (Standard is “C:” and “D:”).
12

Import GTC Packages to Teamcenter

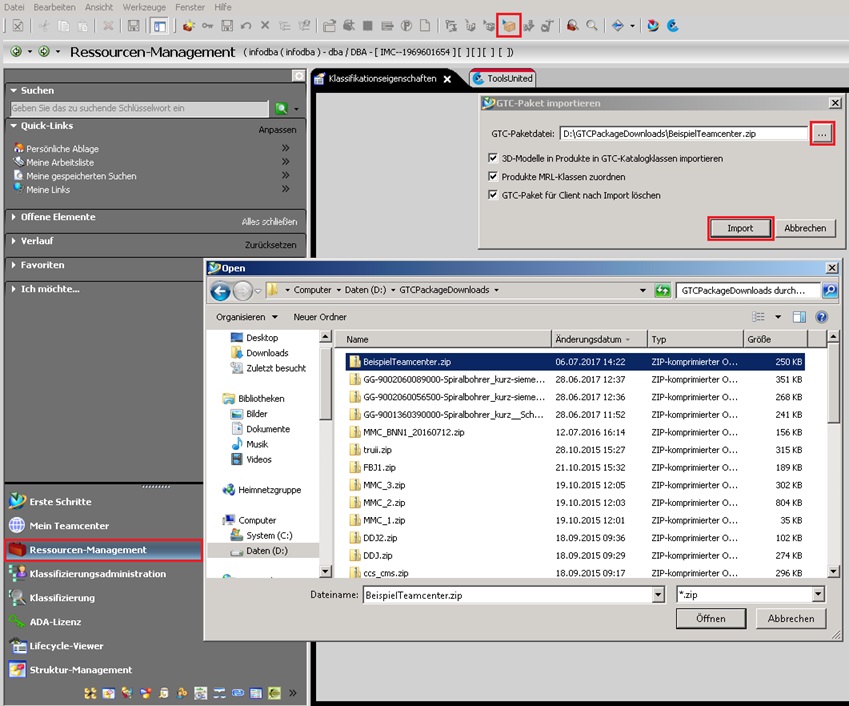
  • In the navigation pane on the lower left, choose the “Resource Management”
  • Click the “Import GTC package and map from catalog to customer area” button from your toolbar at the top
  • A dialog will appear. Choose the GTC Package you have downloaded. By ticking, you may also trigger the following options:
    • The import of 3D models
    • Mapping tools from GTC ToolsUnited classes to MRL Tool Component classes
    • Deleting the GTC packages from the Teamcenter client
13

Search for imported tools

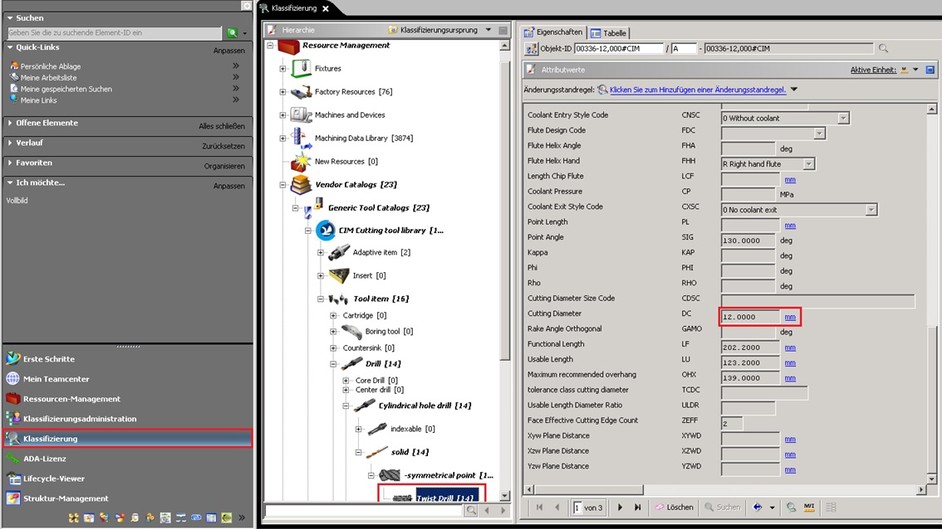
Successfully imported tools will be displayed in the application “Classification”. Extend the hierarchy to the respective tool subclass and search for e.g. the Cutting Diameter.
Any questions?

If you have any questions, please contact our support. We are happy to help!